Showing posts with label seowidgets. Show all posts

Monday, November 11, 2013

How To create a sitelinks through webmaster tools

How To create a sitelinks through webmaster tools


How To create a sitelinks
our site links provided a page rink and index our site a google search engine. our sitelinks is very important . if any people any keywords search in google search engine ralated our keywords our site is top of list how to create a site links through webmaster tools . very simple sign in google webmaster tools throush your gmail account. and click of your site and then

How to Optimize Post Title in our blog

How to Optimize Post Title in our blog
this is a blogger customization if our blogger have not a customization then our blog have no page rank and no index in search engine. so complete the customization then your blog index in google search engine and your post show in google search engine how to optimize post title in your blog see this 
How to Optimize Post Title in our blog
sign in the blogger dashboard and click the template and click the edit html
and now click the the ctrl+f  open a box and this box name search box.

Sunday, October 27, 2013

How To Submit Blogger Sitemap To Google Webmaster Tools?

How To Submit Blogger Sitemap To Google Webmaster Tools?

To be successful in your blogging career you must have to generate decent organic traffic to your blog. By the term “organic traffic” I mean the traffic which comes to your blog through search engines like Google. If you are a new blogger then you should be aware with the Google Webmaster Tools. This is a great tool which is provided by Google itself. It helps your blog being indexed in Google and improve its crawling rate. You just need to verify your blog ownership in Google Webmaster Tools and then submit a simple sitemap. It is very important to submit blogger sitemap to Google in terms of SEO which tells Google about your blog and its content. Whenever you update your blog with new posts, your sitemap helps to index them easily in search engines. This is the topic of my today’s post. Let see how to add blogger sitemap to Google Webmaster Tools.

Submit Blogger Sitemap To Google Webmaster Tools

Below are some easy steps you have to go through in terms to submit your blogspot blog sitemap.

How to Add Custom Robots.txt file in Blogger


What is Robots.txt?

Robots.txt is a text file which contains few lines of simple code. It is saved on the website or blog’s server which instruct the web crawlers to how to index and crawl your blog in the search results. That means you can restrict any web page on your blog from web crawlers so that it can’t get indexed in search engines like your blog labels page, your demo page or any other pages that are not as important to get indexed. Always remember that search crawlers scan the robots.txt file before crawling any web page.
Each blog hosted on blogger have its default robots.txt file which is something look like this:
User-agent: Mediapartners-Google
Disallow:
User-agent: *
Disallow: /search
Allow: /
Sitemap: http://example.blogspot.com/feeds/posts/default?orderby=UPDATED

Explanation

This code is divided into three sections. Let’s first study each of them after that we will learn how to add custom robots.txt file in blogspot blogs.

How to block a web site in Windows 7

How to block a web site in Windows 7
Windows operating system is having some many features that are not visible to all. One such feature is blocking the web sites which we don't want to see. You children may browser your system and you want to block some known sites like games, other adult sites. In Windows Vista and Windows 7 operating system you can block the sites without any 3rd party software.

All you need to do is to add the web sites in hosts file which is in Windows system folder. This is not a new concept which exists in old version of Windows operating system. It requires administrator permission to modify and save the hosts file.

Host file will map the IP address to a host and it is controlled by the administrator of the system.

To block Web sites


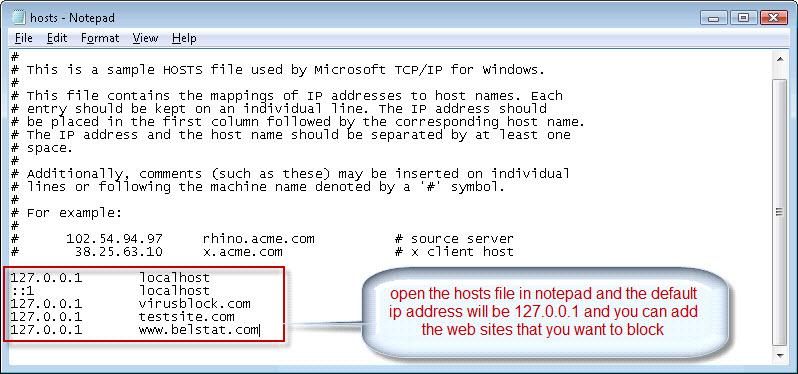
Open the location C:\Windows\System32\drivers\etc and you can see a list of files.

Open the hosts file in a notepad and you can a default address with 126.0.0.1 and localhost. Below that add the web sites that you want to block. One web site can be added in one line (check the below screen shot) Enter the Default IP address and the website address name
All the IP address should be 127.0.0.1 and the web sites can be any web sites that you want to block. Once you added all the web sites save the file. Even as a administrator you cannot edit the file. You need to assign permission to edit the file and you can start editing the file. Any time you can edit the hosts file and you can add or remove the web sites to allow or block.

Tuesday, October 8, 2013

How to Add Alexa traffic rank Stats Badge on your Blog and Website

Everyone who has a website or Blog should know about Alexa website.it not just a website.Today Alexa traffic rank is valid measure that count the popularity of each site. Alexa traffic rank is updated daily. Which means you're not to worry about how will my Alexa rank improve and how I can attract advisers and improve my online presence.The value of Alexa traffic ranks is very important as a webmaster.Because advertisers check the Alexa rank of the site before dealing with site.So proceeding good Rank in Alexa is really important as a web site owner.

Alexa Inc provides some Widgets for wbmasters and bloggers. One of these gadgets is Alexa traffic rank badge or rank stats widget.It show the alexa rank of particular site andalexa backlinks.By displaying one stats widgets on your site,You can build trust of advisors also amaze your readers.I have brought some codes of these badges.You can add one of desired Alexa traffic rank badges below to your blog or website.


Small Button  (120 x 65)
<a href="http://www.alexa.com/siteinfo/Your_site_Address"><script type='text/javascript' src='http://xslt.alexa.com/site_stats/js/t/a?url=Your_site_Address'></script></a>

How to change Font Size of your blogger blog pages?

How to change Font Size of your blogger blog pages

One considerable aspect of any success blogger is its DESIGN. Template setup,Widget settings and content settings are belonged to Design.Readership and Readability are dominant factors that must have in any site.You know it.Having suitable content width, font size of any blog gives many advantages such as increasing the conversion rate and pageviews per user and also unique page views.

Some users confuse to realize the content of some blogs.Any blog receives the visitors from different of ages.Twenty age visitors can read the content speedily than other readers. Forty age readers get more time to read the content.also some of them aguise pair of spectacles.Sixty age readers get most time to read the articles than other younger readers.most of them ZOOM the web page to read the article clearly.We want all these readers.

READERS ARE THE FOUNDATION OF EXISTENCE OF ANY SITE

In this tutorial you will learn how to change the Font size of your body copy.Font size of your blog is different from each blogs.It is depended on your blog niche,Template/Theme and your writing style.But having undisguised font size is really good for any site.I distinguish that having 16px or more than font size on your site is really good.(16px is equal to 1em),You may think that 16px fonts are big,but it is not.Font Family for "Georgia" and 16px font size is matching for any site.But,don't increase your font size more than your headlines.It will confuse you  and especially your readers.Now let's learn how to change your blogger blog content font size easily.

.....................................................................................................................................

Change the Font size of your blog

.....................................................................................................................................

1. Sign in to your blogger account.
2. Go to your Blogger Dashboard--> Select one blog --> Template -->Edit HTML.
3. Now find body selector code on your template within skin tags.
4. You will be found similar Css code like below.

How to Create static pages in Blogger

How to Create static pages in Blogger


What are Blogger static pages?


Blogger allows you to make specific pages like About me,Contact me,Privacy & Terms etc. These pages are Stand-alone pages.You can publish static information on these pages.Static pages are similar to post pages.But There are some differences between post pages and static pages.Static pages are not shown on homepage and not included in Labels.Address of static page is different than usual post pages(Not include the date).It also static pages are not indexed as Archive pages.But Static pages are ranked in Search results highly than some posts.Keyword-rich static pages can rank in higher positions in your search queries.

How to create Static pages?


Step 1 : Sign in to your Blogger account.
Step 2 : Now click on "pages" from the drop down menu near the your blog's title.
Step 3 : Click New page-> Blank page.

Step 4 : Now type your page content from "Compose" mode or edit its content clicking on "HTML" button.

Step 5 : After you add content to page,Click on Preview button to see how it will appear on your blog.


Step 6 : When you finished editing the page,click on Publish button to publicize your static page.

How To Add Horizontal menu bar for Blogger

How To Add Horizontal menu bar for Blogger

Step 1:  Sign in to your Blogger account.
Step 2:  From Blogger Dashboard,go to Layout.
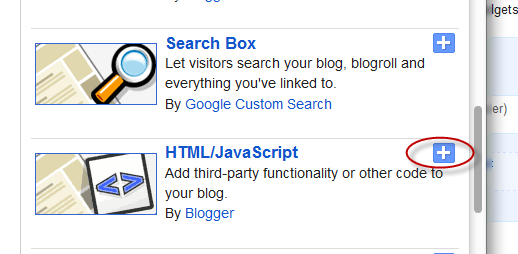
Step 3:  Now click on "Add Gadget" link and find HTML/JavaScript element on the pop up window.
Step 4:  Paste below codes on your "HTML/JavaScript" element and make below changes on the given codes.

<style>
#hrnav05 {
list-style-type:none;
padding:0px;
margin:0px;
font-family:Helvetica,Arial,'DejaVu Sans','Liberation Sans',Freesans,sans-serif;
font-size:18px;
}
#hrnav05 li {
display:inline;
float:left;
margin:0px;
}
#hrnav05 li a {
color:#EDEA3B;
padding:11px;
text-decoration:none;
text-transform:capitalize;
background:#B7B7B7;
border-style:solid;
border-color:transparent;
border-width:3px;
-moz-transition:all 250ms ease-out;
-webkit-transition:all 250ms ease-out;
-o-transition:all 250ms ease-out;
transition:all 250ms ease-out;
}
#hrnav05 li a:hover {
color:#B20000;
border-style:solid;
border-color:#B0B0B0;
box-shadow:inset 0px 0px 8px 10px #ccc;
-moz-transition:all .3s ease-in ;
-webkit-transition:all .3s ease-in ;
-o-transition:all .3s ease-in ;
transition:all .3s ease-in ;
}
</style>
<br/>
<div id="hrnav05">
<ul>
<li><a href="#">Home</a></li>
<li><a href="#">Products</a></li>
<li><a href="#">Currency converter</a></li>
<li><a href="#">Our Group</a></li>
<li><a href="#">Blog</a></li>
<li><a href="#">Contact</a></li>
</ul>

Friday, October 4, 2013

How to add recent comments widget with avatars in blogger

How to add recent comments widget with avatars

Step 1. Go to Blogger Dashboard, then go to Layout and click on Add a Gadget link.

avatars, recent comments blogger, blogger widgets

Step 2. In the popup window scroll down + choose HTML/Javascript


Step 3. Paste in the following code in the empty box:

 <style type="text/css">
ul.w2b_recent_comments {
    list-style: none;
    margin: 0;
    padding: 0;
}

.w2b_recent_comments li {
    background: none !important;
    margin: 0 0 6px !important;
    padding: 0 0 6px 0 !important;
    display: block;
    clear: both;
    overflow: hidden;
    list-style: none;
}
Here are some amazingly funny emoticons compatible with your Blogger comments - also with threaded commenting system! If you want to know how to add them, just follow the next steps:

emoticons, smileys, blogger, tricks

Step 1.

Go to Dashboard - Template - Edit HTML - Proceed


...and select Expand Widget Template (don't forget to make a backup)

    Step 2. Search (using CTRL + F) for this code:

    • For previous commenting system: 
     <h4 id='comment-post-message'><data:postCommentMsg/></h4>
    • For threaded comments:
     <div class='post-footer-line post-footer-line-3'>

    How To Embed A Youtube Playlist On Your Blogger Blog?

    In this post we will see how to create a YouTube video gallery using jQuery. It is an elegant gallery in which we can add 5 videos and for its dimensions, we could put it below the blog header. Actually you can put it anywhere, but it is recommended in that area considering that 765px is the width of the gallery.

    youtube to blogger
    To add this video slider to your blog go to Template > Edit HTML and before the </head> tag, add these scripts:

    <script>
    //<![CDATA[
    /*hoverscroll v.0.2.4*/
    (function($) {
    $.fn.hoverscroll = function(params) {
    if (!params) { params = {}; }
    params = $.extend({}, $.fn.hoverscroll.params, params);
    this.each(function() {
    var $this = $(this);
    if (params.debug) {$.log('[HoverScroll] Trying to create hoverscroll on element ' + this.tagName + '#' + this.id);}
    if (params.fixedArrows) {
    $this.wrap('<div class="fixed-listcontainer"></div>')
    }
    else {
    $this.wrap('<div class="listcontainer"></div>');
    }

    $this.addClass('list');
    var listctnr = $this.parent();
    listctnr.wrap('<div class="ui-widget-content hoverscroll' +
    (params.rtl && !params.vertical ? " rtl" : "") + '"></div>');
    //listctnr.wrap('<div class="hoverscroll"></div>');

    var ctnr = listctnr.parent();

    var leftArrow, rightArrow, topArrow, bottomArrow;
    if (params.arrows) {
    if (!params.vertical) {
    if (params.fixedArrows) {
    leftArrow = '<div class="fixed-arrow left"></div>';
    rightArrow = '<div class="fixed-arrow right"></div>';

    listctnr.before(leftArrow).after(rightArrow);
    }
    else {
    leftArrow = '<div class="arrow left"></div>';
    rightArrow = '<div class="arrow right"></div>';

    listctnr.append(leftArrow).append(rightArrow);
    }
    }
    else {
    if (params.fixedArrows) {
    topArrow = '<div class="fixed-arrow top"></div>';
    bottomArrow = '<div class="fixed-arrow bottom"></div>';

    listctnr.before(topArrow).after(bottomArrow);
    }
    else {
    topArrow = '<div class="arrow top"></div>';
    bottomArrow = '<div class="arrow bottom"></div>';

    listctnr.append(topArrow).append(bottomArrow);
    }
    }
    }
    ctnr.width(params.width).height(params.height);

    if (params.arrows && params.fixedArrows) {
    if (params.vertical) {
    topArrow = listctnr.prev();
    bottomArrow = listctnr.next();

    listctnr.width(params.width)
    .height(params.height - (topArrow.height() + bottomArrow.height()));
    }
    else {
    leftArrow = listctnr.prev();
    rightArrow = listctnr.next();

    listctnr.height(params.height)
    .width(params.width - (leftArrow.width() + rightArrow.width()));
    }
    }
    else {
    listctnr.width(params.width).height(params.height);
    }

    var size = 0;

    if (!params.vertical) {
    ctnr.addClass('horizontal');
    $this.children().each(function() {
    $(this).addClass('item');

    if ($(this).outerWidth) {
    size += $(this).outerWidth(true);
    }
    else {
    size += $(this).width() + parseInt($(this).css('padding-left')) + parseInt($(this).css('padding-right'))
    + parseInt($(this).css('margin-left')) + parseInt($(this).css('margin-right'));
    }
    });
    $this.width(size);

    if (params.debug) {
    $.log('[HoverScroll] Computed content width : ' + size + 'px');
    }
    if (ctnr.outerWidth) {
    size = ctnr.outerWidth();
    }
    else {
    size = ctnr.width() + parseInt(ctnr.css('padding-left')) + parseInt(ctnr.css('padding-right'))
    + parseInt(ctnr.css('margin-left')) + parseInt(ctnr.css('margin-right'));
    }

    if (params.debug) {
    $.log('[HoverScroll] Computed container width : ' + size + 'px');
    }
    }
    else {
    ctnr.addClass('vertical');
    $this.children().each(function() {
    $(this).addClass('item')

    if ($(this).outerHeight) {
    size += $(this).outerHeight(true);
    }
    else {
    size += $(this).height() + parseInt($(this).css('padding-top')) + parseInt($(this).css('padding-bottom'))
    + parseInt($(this).css('margin-bottom')) + parseInt($(this).css('margin-bottom'));
    }
    });
    $this.height(size);

    if (params.debug) {
    $.log('[HoverScroll] Computed content height : ' + size + 'px');
    }
    if (ctnr.outerHeight) {
    size = ctnr.outerHeight();
    }
    else {
    size = ctnr.height() + parseInt(ctnr.css('padding-top')) + parseInt(ctnr.css('padding-bottom'))
    + parseInt(ctnr.css('margin-top')) + parseInt(ctnr.css('margin-bottom'));
    }

    if (params.debug) {
    $.log('[HoverScroll] Computed container height : ' + size + 'px');
    }
    }
    var zone = {
    1: {action: 'move', from: 0, to: 0.06 * size, direction: -1 , speed: 16},
    2: {action: 'move', from: 0.06 * size, to: 0.15 * size, direction: -1 , speed: 8},
    3: {action: 'move', from: 0.15 * size, to: 0.25 * size, direction: -1 , speed: 4},
    4: {action: 'move', from: 0.25 * size, to: 0.4 * size, direction: -1 , speed: 2},
    5: {action: 'stop', from: 0.4 * size, to: 0.6 * size},
    6: {action: 'move', from: 0.6 * size, to: 0.75 * size, direction: 1 , speed: 2},
    7: {action: 'move', from: 0.75 * size, to: 0.85 * size, direction: 1 , speed: 4},
    8: {action: 'move', from: 0.85 * size, to: 0.94 * size, direction: 1 , speed: 8},
    9: {action: 'move', from: 0.94 * size, to: size, direction: 1 , speed: 16}
    }

    ctnr[0].isChanging = false;
    ctnr[0].direction = 0;
    ctnr[0].speed = 1;
    function checkMouse(x, y) {
    x = x - ctnr.offset().left;
    y = y - ctnr.offset().top;

    var pos;
    if (!params.vertical) {pos = x;}
    else {pos = y;}

    for (i in zone) {
    if (pos >= zone[i].from && pos < zone[i].to) {
    if (zone[i].action == 'move') {startMoving(zone[i].direction, zone[i].speed);}
    else {stopMoving();}
    }
    }
    }

    function setArrowOpacity() {
    if (!params.arrows || params.fixedArrows) {return;}

    var maxScroll;
    var scroll;

    if (!params.vertical) {
    maxScroll = listctnr[0].scrollWidth - listctnr.width();
    scroll = listctnr[0].scrollLeft;
    }
    else {
    maxScroll = listctnr[0].scrollHeight - listctnr.height();
    scroll = listctnr[0].scrollTop;
    }
    var limit = params.arrowsOpacity;
    var opacity = (scroll / maxScroll) * limit;

    if (opacity > limit) { opacity = limit; }
    if (isNaN(opacity)) { opacity = 0; }

    var done = false;
    if (opacity <= 0) {
    $('div.arrow.left, div.arrow.top', ctnr).hide();
    if(maxScroll > 0) {
    $('div.arrow.right, div.arrow.bottom', ctnr).show().css('opacity', limit);
    }
    done = true;
    }
    if (opacity >= limit || maxScroll <= 0) {
    $('div.arrow.right, div.arrow.bottom', ctnr).hide();
    done = true;
    }

    if (!done) {
    $('div.arrow.left, div.arrow.top', ctnr).show().css('opacity', opacity);
    $('div.arrow.right, div.arrow.bottom', ctnr).show().css('opacity', (limit - opacity));
    }
    }

    function startMoving(direction, speed) {
    if (ctnr[0].direction != direction) {
    if (params.debug) {
    $.log('[HoverScroll] Starting to move. direction: ' + direction + ', speed: ' + speed);
    }

    stopMoving();
    ctnr[0].direction = direction;
    ctnr[0].isChanging = true;
    move();
    }
    if (ctnr[0].speed != speed) {
    if (params.debug) {
    $.log('[HoverScroll] Changed speed: ' + speed);
    }

    ctnr[0].speed = speed;
    }
    }

    function stopMoving() {
    if (ctnr[0].isChanging) {
    if (params.debug) {
    $.log('[HoverScroll] Stoped moving');
    }

    ctnr[0].isChanging = false;
    ctnr[0].direction = 0;
    ctnr[0].speed = 1;
    clearTimeout(ctnr[0].timer);
    }
    }

    function move() {
    if (ctnr[0].isChanging == false) {return;}

    setArrowOpacity();

    var scrollSide;
    if (!params.vertical) {scrollSide = 'scrollLeft';}
    else {scrollSide = 'scrollTop';}

    listctnr[0][scrollSide] += ctnr[0].direction * ctnr[0].speed;
    ctnr[0].timer = setTimeout(function() {move();}, 50);
    }

    if (params.rtl && !params.vertical) {
    listctnr[0].scrollLeft = listctnr[0].scrollWidth - listctnr.width();
    }

    ctnr
    .mousemove(function(e) {checkMouse(e.pageX, e.pageY);})
    .bind('mouseleave', function() {stopMoving();});

    this.startMoving = startMoving;
    this.stopMoving = stopMoving;

    if (params.arrows && !params.fixedArrows) {
    // Initialise arrow opacity
    setArrowOpacity();
    }
    else {
    // Hide arrows
    $('.arrowleft, .arrowright, .arrowtop, .arrowbottom', ctnr).hide();
    }
    });

    return this;
    };

    if (!$.fn.offset) {
    $.fn.offset = function() {
    this.left = this.top = 0;

    if (this[0] && this[0].offsetParent) {
    var obj = this[0];
    do {
    this.left += obj.offsetLeft;
    this.top += obj.offsetTop;
    } while (obj = obj.offsetParent);
    }

    return this;
    }
    }

    $.fn.hoverscroll.params = {
    vertical: false,
    width: 400,
    height: 50,
    arrows: true,
    arrowsOpacity: 0.7,
    fixedArrows: false,
    rtl: false,
    debug: false
    };
    $.log = function() {
    try {console.log.apply(console, arguments);}
    catch (e) {
    try {opera.postError.apply(opera, arguments);}
    catch (e) {}
    }
    };
    })(jQuery);

    $(function(){
    $("#videoslider-tabs a").click(function(){
    var container = $("#videoslider-content");
    container.html("<img src='https://blogger.googleusercontent.com/img/b/R29vZ2xl/AVvXsEiCUwJjk3ywuNkNlRCKmWxw2HVF598ovn7s3Eky9HM0yt7iJ4npUIYs46mjcvzda1SYgUgsYatLF-wQPv4mOCMgch5lgoo4dE_5lYQIT8ol3-fSA4OAXjUvu9_ZpIdciVig0-F3-uggyhwK/s1600/loading.png' class='loading-vid' />");
    var id = $(this).attr("href").slice(1);
    loadvideo(id);
    return false;
    });
    $("#videoslider-tabs").hoverscroll({vertical:true,width:300,height:330,arrows:false});
    $("#videoslider-tabs li").hover(function(){$(this).addClass("hover");},function(){$(this).removeClass("hover");});
    loadvideo();
    });

    function loadvideo (hash){if(hash){hash = hash.slice(3);$("#videoslider-content").html(video[hash]);$("#videoslider-tabs li").removeClass("actVid");$("#videoslider-tabs a[href=#vid"+hash+"]").parent().addClass("actVid");}else{$("#videoslider-content").html(video[1]);$("#videoslider-tabs li").removeClass("actVid");$("#videoslider-tabs a[href=#vid1]").parent().addClass("actVid");}}
    //]]>
    </script>

    Then add the styles before ]]></b:skin>

    How to add recent posts widgets in blogger?

    The main advantage on this Recent Posts widget is that it will show not only post titles but also post excerpts or snippets and it's easy to customize/ apply different style on it. To style it into your own design, you just have to modify the CSS style - you can change the link or background color, the size and color of text/links. 

    What you can do with this widget:
    • display post titles only
    • change the number of posts
    • change the number of characters of the post snippet/excerpt
    • show the post dates

    See the screenshot below:

    How to add Recent Posts Widget to Blogger

    Step 1. Log in to your Blogger Dashboard, then go to Layout and click on Add a Gadget link


    Step 2. From the pop-up window, scroll down and choose HTML/JavaScript


    Step 3. Select & Copy the code from one of the options below and paste it into the new HTML/JavaScript: 

    Monday, September 30, 2013

    How to add sitemap in blogger

    How to add sitemap in blogger


    Generate a Complete Sitemap for your Blogger Blog

    Step:- 1  Open the Sitemap Generator and type the full address of your blogspot blog (or your self-hosted Blogger blog). 

    Step 2:-Click the Create Sitemap button and this tool will instantly generate the necessary text for your sitemap. Copy the entire generated text to your clipboard (see screenshot below).

    Step 3;-Next go to your Blogger dashboard and under Settings – > Search Preferences, the enableCustom robots.txt option (available in the Crawling and Indexing section). Paste the clipboard text here and save your changes.

    Friday, September 27, 2013

    How to Add A Contact Form In Your Blogger Blogspot

    How to Add A Contact Form In Your Blogger Blogspot

    Creating a contact form page in your blog will be helpful for your readers as then they will be able to communicate with you directly. It will give them a easy way to share their problems with you. Even this will allow them to give feedbacks and viewpoints to you for your blog.

    It is easy to create contact form in wordpress blogs. Blogger don't have such feature but good news is that you can create contact form in Blogger by adding some piece of codes. There are many websites providing this kind of services. Emailmeform.com is one of such website that provides this kind of service. Emailmeform provides free code for using a contact form. This tutorial will help you to create a contact form page in blogger.

    Steps To Add A Contact Form In Your Blogger Blog

    Step 1) Sign up for a free account at email me form
    Step 2) Once you done with regstration process, click on the "Add Form" button.
    Step  3) A popup window wll come up to show you two options:

    a) You can go to template section and choose from a list of pre-made forms.
    b) Or you can go to form builder to create your own form.

    How To Submit Blogger Sitemap To Google Webmaster

    How To Submit Blogger Sitemap To Google Webmaster

    Today I am going to show you how you can submit your Blogger blog to the giant search Engine - Google. Google is the most popular search engine and number of webpages indexed by Google is uncountable. To make Google find, index and rank your site you need to submit your sitemap of your site to Google Webmaster Tools. Google Webmaster is a good SEO tool to use. You could also keep track of your sites statistics with the help of Google Webmaster Tools. As a new blogger you may not know how to submit your blogger sitemap to Google Webmaster Tools. Here I am to help you.

    Steps To Submit Blogger Sitemap To Google Webmaster:-

    Step 1) Go to http://www.google.com/webmasters/

    Step 2) Sign in to Webmaster Tools with your gmail id and password


    Step 3)You can see now a thumbnail and a link of your site. Click on the anyone of them to go to Dashboard of Webmaster Tools.

    Step 4) Click on Sitemaps(Left side)

    Wednesday, September 25, 2013

    How to add signature in gmail

    How to add signature in gmail


    Step:-1  Click the Settings gear in your Gmail toolbar Then Click Setting Tab


    Step 2 :-  Select Settings from the menu that will have appeared.then Go to General.


     Step 3:-  Make sure the desired account is selected under Signature:.Type the desired signature in the text field.It's best to keep your signature to about five lines of text.

    Step 4. Click Save Changes.

    Tuesday, September 24, 2013

    How to add a widget in blogger

    How to add widget in blogger

    Step 1:-Log in to your Blogger account with your username and password. Once you are logged in, make sure you are at your Blogger's Dashboard, otherwise click on the "Dashboard" link, which will take you to a list of your blogs.
     Step 2:-Access the Layout page of your blog. After selecting your blog, click on the "Design" link, which will take you to the Layout page. Click on the "Page Elements" link, then click on "Add a Gadget."

    Step 3:- Choose a widget or gadget. A Blogger pop-up window will appear that lists all the gadgets available to you through Google Blogger. You may search for the name of a specific gadget, or you can browse through several categories, including Basic gadgets, Featured gadgets, Most Popular gadgets or More Gadgets, which are contributed by third-party developers for Blogger.
    Step 4:-Add the widget to Blogger. Once you find the widget you want to add, click on the blue plus sign symbol to add it to your blog's layout. On the Layout screen, you will be able to click and drag the widget to where you want it to appear on your blog.
    Save your changes. Once you have added the widgets you want to your layout, click on the "Save" button at the bottom of the Layout screen to save your changes to Blogger.

    Step 5:- Add a custom widget to Blogger using the HTML and JavaScript widget. The HTML and JavaScript widget within Blogger is a blank widget that allows you to add or paste third-party functionality or other code to your blog. The HTML and JavaScript widget can be found by clicking on "Add a Gadget" from the Blogger Layout screen.

    And if you want more info check these video